Wednesday, April 30, 2014

Useful tools for Ubuntu

These are some of the tools I found to be useful. This list is far from being comprehensive; depending on what you're up to, you might still have to search for the tools you need, but I suppose this is a good start.

Installing new tools and applications
Most tools can be installed via Ubuntu's Software Center or other package managers. Sometimes, however, you're left with just the command line install instructions:

The line commands needed to update / install software need to be run under the root user. To do that, the command needs to be preceded by the keyword sudo

If the tool isn't in one of the software repositories available to your system, the repository it belongs to must be added before you can actually install the software:

sudo add-apt-repository ppa:[repository name].

If this is necessary, the add-apt-repository command, includingthe actual repository name, usually comes with the installation instructions.


It is good practice to update the package information before running any installation process:

sudo apt-get update

Note that this does not actually update any components of your system, it merely updates the list of available packages and their versions.


The following command actually installs your tool / application:

sudo apt-get install [softwarename]

So, let's add some software:

Synaptic Package Manager
Install, update, and remove software packages via a convenient GUI
Synaptic Package Manager home page

Installation
Via Ubuntu software center

GDebi Package installer
Another useful package installer
GDebi package installer homepage

Installation
Via Ubuntu software center

MAC Changer
If you wish to hide your computer's identity, be it for privacy reasons or simply to circumvent the time limit of a public WiFi hotspot, you need to change the MAC address your computer is broadcasting to the world. MACChanger is a command-line tool that does exactly that.

See also my earlier post regarding this tool

Installation
sudo apt-get update
sudo apt-get install macchanger

DConf editor
DConf is a basic key / value database where desktop environment settings are stored. DConf Editor allows you to view and modify these settings (see also the section on file explorer settings in my post on setting up Ubuntu).

Installation
sudo apt-get update)
sudo apt-get install dconf-tools

LibreOffice
The LibreOffice version included in your Ubuntu distribution may be outdated; check for updates (for example via Synaptic Package Manager).

Extensions
The basic functionality of LibreOffice can be extended according to your specific needs by installing, well, extensions. Dictionaries are part of the extensions set, so you may need to deal with extensions even if all you want to do is type (and spell-check) the occasional document in a language other than standard US English.

Extensions can be found here; this site can also be accessed directly via the Extensions dialog within LibreOffice (Tools --> Extension Manager).

To install an extension pack:
1) Download extension pack file (*.oxt)
2) Install via the Add... button in the LibreOffice Extension Manager (Tools --> Extension Manager)

That's all for today; I shall recommend a few more useful applications later.

Tuesday, April 29, 2014

Ubuntu file explorer preferences

While most file explorer settings are managed via the File Management Preferences dialog (Menu edit -> Preferences, some can only be changed directly in the DConf database. DConf is a simple key/value database to manage system settings as well as settings for tools and some applications.

You can edit the DConf via the accurately named DConf editor. Unfortunately this handy tool isn't part of the Ubuntu 12.04 setup, so you need to install it first:

sudo apt-get update
sudo apt-get install dconf-tools

There's one file explorer setting in particular that not only is not accessible via the Preferences dialog, but is also set by default to a setting that most users probably want to change.

By default, the file explorer displays the path to your current location as a series of buttons.

File explorer window with directory path buttons

While these buttons allow you to quickly jump up and down as many levels of the hierarchy as you like, they of course won't let you directly type in a directory location, nor can you paste a file path from the clipboard, or copy the path to your current directory to the clipboard.

You might therefore prefer the more traditional text box that allows you do exactly that.

To change the file explorer navigation from buttons to location entry

1) Open the DConf editor

2) Navigate to org -> gnome -> nautilus -> preferences

3) Tick the checkbox of the always-use-location-entry parameter

DConf Editor

There you have it; the directory location input control just like you remember it from the operating system that shall not be named.

File explorer window with directory path input

Monday, April 28, 2014

Installing Ubuntu

After a recent SNAFU provided the opportunity to rebuild my Ubuntu machine from scratch, I decided that this time around, I might as well keep track of what I'm installing. So, here we go, starting with, well, the actual operating system.

So, I'm installing Ubuntu 12.04 on ye olde Lenovo ThinkPad T60, with 1 GB of RAM and a 60 GB hard drive.

On a side note, I'm by no means an expert on this; if you notice any obvious (or even just subtle) errors or mistakes, please let me know.

You can find the minimum requirements to install and run the operating system here. For Ubuntu 12.04, these requirements are
64 MB RAM (512 MB recommended)
5 GB Hard Drive

Download Ubuntu
Download the current version here. Be sure to pick the right version (32 bit vs 64 bit). This download provides an iso file that allows you to create the installation CD.

Once downloaded, burn the iso file onto a recordable optical disk.

Note The iso file for Ubuntu 12.04 is 731 MB big, so you need to make sure you're using a blank CR-R that can actually take that much data (the capacity of a standard CD-R is 700 MB), and use a CD burner and software that feature the overburn option. Alternatively, you may want to burn the iso file onto a recordable DVD, just to be on the safe side.

Install Ubuntu
1) Boot the computer with your brand new Ubuntu installation disk in the CD/DVD drive (depending on your computer, you may have to manually interrupt the boot process and direct it to boot from the CD/DVD drive. The installation disk provides 3 options:

Install Ubuntu as the only system on the maching. Any data that might sit on the hard disk will be erased, the entire hard disk will become part of the Ubuntu environmental

Install Ubuntu on a separate partition. Alternatively, you can create a new partition just for Ubuntu, while leaving, for instance, your Windows environment intact. This will give you a dual-boot machine where you can run either Ubuntu or whatever other operating system you have already installed there. Obviously, for this option, your hard drive needs to be big enough to support both operating systems.

Explore Ubuntu from CD If you're not ready to commit just yet, you can start Ubuntu from the installation disk, explore the features and tools, all without making any change whatsoever to your computer.

Ideally, your computer is connected to the internet while you run the installation process, this allows Ubuntu to download any updates that may not have been included in the release provided with the iso file as part of that installation process.

Post installation updates
Even if you ran the installation process while connected to the internet and the option Download available updates selected, the first thing to pop up after starting your brand new Ubuntu system for the first time may still be the Update Manager. So you may spend some more time letting that Update Manager do its job, that way you're at least certain that your system is well and truly up to date.

First steps
If you intend to run Ubuntu with a dual screen setup (or with a single big-ass monitor), you will need to switch to Ubuntu 2D, as Ubuntu 3D supports only a very limited maximum screen size. To switch between 2D and 3D, click the little Ubuntu logo next to your user name on the login screen.

Ubuntu comes with a range of tools and applications, so you're pretty much good to go. The following list is by no means exhaustive, it just features some of the tools that may help you with your most common everyday tasks:

Mozilla's Firefox web browser. As with all applications, you may want to check for updates, as the Ubuntu distribution may not include the latest version. I'm mentioning this here specifically because the Firefox version that came with my Ubuntu download was very outdated.

Mozilla's Thunderbird email client

LibreOffice Office suite, featuring a word processor, spreadsheet application, and presentation / slideshow tool. And yes, they can handle (and create) Microsoft Office files). Additional applications are available and free, too.

Rhythmbox Music player

Movie player. It plays videos (well what did you expect)

Brasero Disk burner

GEdit text editor

Ubuntu One
For those who are keen to share their content with the NSA and other cyber-scum, Ubuntu used to provide (and still includes the tool in its current distribution) the Ubuntu One cloud service and online music store. However, this notification informs us that Ubuntu One will be shut down from June 1, 2014. So, if you're reading this before that date, it's probably best not to bother.

Saturday, March 22, 2014

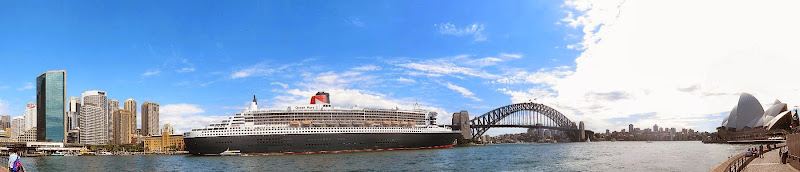
The Queen Mary 2 in Sydney

About a week ago, the Queen Mary 2, shipping company Cunard Line's flagship once again visited Sydney. The 151,400 ton ship is 345 meters (1,132 ft) long, 41 meters (135 ft) wide (45 m / 147 ft 6 in) at bridge wings), and with a height of 72 meters (236 ft 2 in), it's too high to fit under the Sydney Harbor bridge.

14 of the 17 decks are available to the guests / passengers. The maximum capacity is 3,090 passengers, with a crew of 1,288 looking after the guests and running the ship.

Further technical data and key figures are available on this technical fact sheet (PDF).

You can also explore the QM2's deck plans (PDF).

And now, as you've probably guessed already, I'm gonna show off some of the photos I took during the QM2's visit:

Queen Mary 2

Queen Mary 2

Queen Mary 2


Note: Photos have been processed with GIMP; composite images have been created with Hugin.

Monday, March 3, 2014

What to do

A couple of weeks ago, my DVR went from highly unreliable to completely useless, but miraculously came back to life after some serious pretend-repairing and looking at it very sternly.

Now, the unit's remote control has followed the recorder's example and, after a few days of constantly deteriorating performance, is now refusing to work at all. No amount of feeding it posh top-brand batteries with fancy words like performance and extreme in the name, gently stroking the buttons, creating an intimate atmosphere by holding the bloody thing really close to the recorder, or waving a stick at it while shouting "Remotus Reparo" seems to coax it back to life.

To make matters worse, the recorder itself features only the most basic set of controls. There's the Power button, a pair of buttons to change the TV channels (up / down), and volume control. That's it. So, without a working remote, it's possible to watch live TV via the recorder, but setting up new recordings, or accessing any of the recorded content, is out of the question.

So, there's the option to buy a new remote control. That's AUD 50 (or thereabouts) on an accessory for a fairly old-ish DVR that, while it's essentially working again, hasn't been quite the same since that near death experience (channel changes take about 4 times as much time as they did originally, and a few channels can no longer be recorded properly), and may die for good any day.

Or I take the hint and spend money on a brand new recorder, probably from a more reliable manufacturer, consigning ye olde Topfield to the council's next available bulk garbage collection, all because of that pesky remote.

What to do, what to do … I'm open to suggestions.

Saturday, March 1, 2014

How to spoof a MAC address

The Media Access Control address is a unique identifier assigned to network interfaces (For more details, see the ever reliable Wikipedia or ask Google). The MAC address is hard-coded on the Network Interface Controller (NIC). Consequently, it always remains the same, no matter where in the world you connect to the internet, and regardless of any VPN and / or proxys you might use.

You can, however, make your operating system (and subsequently the LAN you're connecting to) believe that your NIC has a MAC address of your choosing (or a randomly generated one, for that matter), rather then the one hard-coded on said NIC.

Perhaps the end user agreement of a web-based service you've subscribed to only allows you to connect a limited number of devices (or even just one), and you need to connect your new computer.

Perhaps you want to hide your identity (and that of your computer) in order to protect your privacy.

Perhaps the time-limit of the public hot spot you're using has expired (airports, public transport, coffee shops, etc), and you need to convince the public WLAN that you're connecting with an entirely new device.

Whatever your reasons may be, I won't judge you, I'm just going to show you how to do it.

Install MAC address change tool

A Google search for "MACChanger" lets you find the necessary tool for your operating system.

For Windows, you can download it here, for example.

On Ubuntu 12.04, install MAC changer using this command:

sudo apt-get install macchanger

Spoof a MAC address

Note The following process has been tested on a Ubuntu 12.04 system. For the procedure and syntax applying to your operating system, refer to the instructions on the download site you obtained MAC changer from.

First, you must stop the network manager service:
sudo service network-manager stop

Now, run MAC changer. This example generates a fully random MAC address for your wireless network interface:
sudo macchanger -r wlan0.

To spoof a MAC address for the ethernet network interface, use eth0 as the device identifier.

sudo macchanger -h lists the available options. They are:
-h Help Show summary of options
-V Version Show version of MAC changer
-e Ending Don't change the vendor bytes (e. g. your Cisco NIC will still show up as an Cisco NIC)
-a another Set random MAC address of the same kind
-A Another Set random MAC address of any kind
-p Permanent Reset to original, permanent hardware MAC address
-r Random Set fully random MAC address
-l List List known vendors
-m MAC Set MAC to specific MAC address: macchanger -m XX:XX:XX:XX:XX:XX

Finally, restart the network manager service:
sudo service network-manager start

Note that after shutting down and restarting your system, the operating system will once again broadcast the original, hard-coded MAC address of your NIC to the world.

To restore the original MAC address without rebooting, use
sudo macchanger -p wlan0.

Congrats, you're done

So there you have it. Never get bored to death again when the airport gives you a measly one hour of WiFi connectivity but your flight has just been delayed indefinitely. Now all you have to do is install MACChanger before you get kicked off the WLAN you're using, and Bob's your uncle.

Thursday, January 30, 2014

Australia Day 2014 fireworks display at Parramatta

Immediately after Jessica Mauboy finished her concert, the fireworks display marked the official end of the festivities with a bang or two.

Fireworks

Fireworks

Fireworks

Fireworks

Fireworks


Wednesday, January 29, 2014

Australia Day 2014 concert

As usual, Parramatta had booked a first class act to conclude the local Australia Day festivities. After performing in the city earlier in the day, Jessica Mauboy headlined the traditional evening concert at Parramatta Park.

Jessica Mauboy in concert at Parramatta Park

Jessica Mauboy

Jessica Mauboy

Jessica Mauboy and backup singers

Jessica Mauboy

And the cops kept a close eye on proceedings
Cops at Jessica Mauboy concert

Sunday, January 26, 2014

Fixing a Topfield PVR

How to fix the Topfield TF7100HDPVRt – sort of.

According to the internet, this Topfield model is prone to malfunctions, and my unit is no exception. Granted, it was working mostly fine for a couple of years, with only the occasional glitch stuffing up a recording or so. But lately, things started to come apart hard and fast, with symptoms ranging from random freezing or re-booting during live TV, recording, or playing back recorded programs to hanging (and freezing) during the start-up process.

The same internet that assures me that these are common issues with this model also informs me that there's no reliable cure; and worse, no Topfield customer service that deserves to be called that, at least not in Australia.

With my machine, it started with the occasional crash, escalated to frequent refusal to start up at all, and eventually got to the point where the machine wouldn't boot, ever, without exception.

Considering that things couldn't possibly get any worse, I had the brilliant idea of "having a look at it" myself. Granted, I'm hopeless with mechanical stuff (of which a PVR has none, unless you count the read/write head of the hard drive, or the control buttons on the front panel), and even worse with electronic components. But no matter; perhaps it's as simple as dust buildup interfering with the delicate interiors; after all, the casing is littered with holes (presumably to prevent the thing from overheating).

Anyway, with all that in mind, I got to work:

1) Remove power cord, unplug RF (aerial), HDMI cables, and anything else you might have connected.

2) Unscrew all screws (1 on each side, and heaps at the back)

3) Make sure there's no one else in the room with you. If you're as technically challenged as I am, you're likely to look like a tool, and there's no need for anyone to see that.

4) Slide off the case

5) Notice that the interior of the recorder, the motherboard, and all other components, are surprisingly clean and dust-free

6) Check the hard disk connector. No, it's absolutely firm; no wobbly plug, not a chance of a bad connection

7) Switch on your best I know what I'm doing look and stare at all the components.

8) Connect power cord (and plug it in, duh)

9) Press Power button

10) Observe display at front of unit

11) After a few breathless moments, the word run (which indicates that the machine is booting) disappears, and the name of the last used TV station appears

12) This indicates we've come further than we did in any recent attempts to start the machine. Leave the recorder on for a while, just to be sure

13) Press Power button to turn recorder off, wait for shutdown procedure to complete

14) Unplug power cord

15) Re-attach cover (it's a tight fit), screw all the screws back in

16) Connect recorder to RF outlet and TV

17) Connect, and plug in, power cord

18) Start up the recorder, closely observe boot progress

19) Enjoy your working Topfield recorder, record shows, and finally watch all the stuff you had recorded ages ago but haven't been able to watch yet.

Summary
Yes, it's slightly more complex than Turning it off and turning it on again, but not by much. How simply opening the bloody thing, looking at it very seriously, and closing it again actually resolved the issue may forever remain a mystery, but at least for now, it seems to have worked.


Inside the Topfield TF7100HDPVRT


Thursday, January 16, 2014

Rubber Duck

Finally, a duck face worth writing about. As part of this year's Sydney Festival, Florentijn Hofman's Rubber Duck is visiting Parramatta.

So, here are some pics from said Duck at Parramatta Park:

Duck

Duck

Duck

Duck

Duck

Duck


And just because it's an art festival, here's Rubber Duck in an artsy fartsy black and white setting, making it all profound and deep and meaningful and shit...
Duck