Wednesday, November 12, 2014

Adios Telstra

After recently discussing my first impression of the Optus experience, it's only fair to also share the final moments of my relationship with Telstra.

As mentioned before, the Telstra account becomes inactive the moment you transfer your phone number to another carrier. Once this happens, your online Telstra profile will only say "No active account for this profile", with no option to access pending bills, usage data, or any other details.

Unlike the Optus Life Chat, which is prominently advertised and even (annoyingly) pops up whenever you linger on any given Optus web page for a while, the Telstra chat thingy is well hidden. It takes a fair bit of navigating thru the Support pages before you eventually arrive at a Contact Us page that actually lets you pick the Life Chat feature.

The one positive thing about the Optus chat was that in all instances, I was connected to a consultant almost instantly. Not so here; the Telstra chat window informs me that I'm currently number 24 in the queue. Definitely not a promising start.

It takes approximately 15 minutes to make it to the front of the queue; then, I'm greeted by Joan (and yes, I almost did reply "Watson, is that you?"). Joan quickly sends me a link to their Pay a bill page, where you apparently can make payments even after your Telstra account has been deactivated. After I inquire about access to the actual bill details, Joan offers to send a copy of the bill to my email address.

I submit the payment while I'm still online with Joan (just in case it doesn't work; this is Telstra, after all). But I need not worry, the payment actually goes thru quite smoothly; it seems they at least have the parts needed to take our money running well.

The actual support chat took about 5 minutes; plus the 15 minutes I waited in the queue.

So, this time, the support staff turned out to be the best performing part of the system.

Suggestion to Telstra: When an inactive account still has a balance that's not zero, include a link to that Pay a bill page on the online account landing page.

And now I'm done. Hasta la vista, Telstra.

Tuesday, November 11, 2014

The Optus experience - summary

As regular readers might have picked up, I've switched my mobile phone to Optus Prepaid. It's been a somewhat bumpy ride with cunningly hidden information, well-meaning but mostly clueless customer service staff, and the inevitable spam. If you have the time to read it all, please do:


To sum up:

What
Optus My Prepaid daily
  • Prepaid semi-flat rate plan based on daily usage. The first outgoing standard national call, SMS, MMS, or data use triggers the basic daily rate of $ 1.00. After 30 mins of talk, or 40 MB of data, that daily rate automatically jumps to $ 1.50, giving you unlimited talk, and another 40 MB of data (SMS / MMS are unlimited with the intial $ 1.00).

  • Once the extra 40 MB are also used up, increments of $ 0.50 / 50 MB are added, up to a total of $ 5.00 for the day. After that, you can obtain additional data blocks at $ 2.00 / 200 MB and $ 5.00 / 500 MB, but you must actively purchase them, they're not automatically added, so you keep in control of just how much you spend.

  • Non – standard items like international messaging, international calls, etc, are charged by the item.

  • If you use a lot of data, you might wanna look at My Prepaid Daily Plus, where the initial flat rate of $ 2.00 gives you 500 MB (as well as unlimited standard national calls), and another $ 2.00 adds an extra 524 MB, leaving you with 1 GB for $ 4.00, plus all the national voice calls, SMS, and MMS you want.

The Good
  • The plan itself seems to suit my particular usage pattern; days with no use whatsoever (yes, that happens) won't cost me anything, the daily cost for standard national stuff (talk, messages, a little data) seems acceptable, international rates seem surprisingly reasonable, and roaming, although expensive, is available if necessary.

  • The web site is easy to use, most (but not all) information can be found without too much trouble, support (although not always helpful) is easily available via the prominent Live Chat feature.

  • Sales assistant at the Parramatta store is friendly efficient, and at least to some degree, seems to know what she's doing

  • Once set up, the service works as expected

  • Online account provides a good overview of the account status, credit, usage, as well as easy access to account settings and extras

  • Account status info via basic text message (that therefore works on even the oldest of phones) provides comprehensive summary of current usage, credit, and remaining talk / data

The Bad
  • Roaming rates are obscenely expensive

  • Although the plan boasts a 6 months expiry of credit, it turns out that in order to keep the service active, the account must actually be recharged at least 30 days before credit expires

  • Some information is more difficult to find than necessary. Some relevant parts are not directly linked from the product page

  • After the plan has been set up and activated, the online account to actually manage your plan must be set up separately

  • Online account does not show data usage

  • No mention of, or reference to, the settings required for MMS. You have to find your own way to the page where you can request these settings to be sent to your phone. Go to Support, search for MMS settings. That brings up (at least at the time I'm writing this) the APNS & technical settings. This page lists all the settings you could ever want, and also provides a link to the online tool where you can select the make and model of your phone and have the settings you're after sent to your device. As a side note; the settings page warns, under the details for streaming, that videos and TV can use large amounts of data, and advises to "monitor your usage thru My Account - where, as stated above, the MB usage is not listed!

  • Usage details not available as csv file (print (to any printer, including PDF) is available)

The downright ugly
The extent of complete and utter incompetence and indifference you're likely to encounter both face to face (Merrylands shop, I'm talking about you) and via the Live Chat support channel is something to behold. Be prepared that perfectly ordinary questions that one would expect to be part of those people's everyday work are probably going to be met with an absolute inability to even point you in the right direction. If you ever need to explain the term "Stunned Mullet to someone, just take them to an Optus store, ask the staff a simple question, and observe.

The end
So there you have it. A product that's appealing enough to lure me away from Telstra; a relatively smooth transition; some extremely useless customer service staff spoiling the, well, customer experience somewhat; and some serious doubts about Optus' hiring policies.

Monday, November 10, 2014

The Optus experience - Part 4: The spam

It must be said that Optus is very considerate and doesn't just ignore new customers the moment they walk out of the store. In somewhat regular intervals, you get exciting text messages about the fascinating possibilities of your Optus mobile plan, and of course offers for extras you simply can't refuse – or so they think.

There is an unsubscribe option, which, after you ticked all the categories you don't want to be bothered with, cheerfully confirms that it will "take no more than 5 days to process the request".

It is disappointing that Optus not only chooses the Opt Out approach but then allows itself to keep bothering you with their spam for up to 5 days after you've actually gone thru the trouble to, well, opt out. The decent, non-dodgy way to go would surely be to spare the "valued customer" all those unrequested messages and provide an Opt In option for those who actually want them.

Previous: First steps

Sunday, November 9, 2014

The Optus experience – Part 3: First steps

So, with my new Optus prepaid SIM active, I should be good to go. And sure enough, a series of Optus system messages arrive, some just to remind me what I've just bought (hey, a customer with poor memory is still a customer), some with actual information like voice mail PIN, etc.

Signal strength is good. I do notice that with Optus, the phone does not display the cell tower information, even when the relevant option in the phone is turned on.

Sending a text message (to an international number) works like a charm. Sending an MMS … not so much. I vaguely remember that when I got a new phone, Telstra had to send phone-specific settings to my device to make it work. At first glance, I can't find an "obvious" hint on the Optus website how to set this up, but since I have stuff to do and places to go, this needs to wait for now.

In-store support
So far, things haven't gone too badly, and so when I come across another Optus store (this time in Merrylands), I decide to try my luck. As before, a friendly sales chick quickly inquires how she can help me, but then, it's all downhill from there. I explain the issue to her, and the look on her face, one of utter perplexity and incomprehension, is something to behold. She couldn't have been more stumped if I'd asked her to fix Richie Branson's Virgin Galactic space vehicle. Except, unlike fixing experimental space ships, knowing stuff about mobile phones, especially when it comes to Optus – specific details, is (supposedly) part of her job. Once life returns to her blank stare, she plays around with the phone's settings while mumbling something about "internet settings must be on" (for MMS? Huh?). Meanwhile her very obvious "I can't be bothered to even pretend to give a shit" attitude only completes the picture of absolute, unmitigated incompetence. Eventually, she gives up, handing me the number of the Optus helpline.

In any case, I later find what looks like an answer to the issue in the Optus support section (after a bit of searching around). Under Setup via internet, you will find a link to the online tool, where you can pick your phone (make and model), and then can select the service you need the settings for (to set up multiple services, repeat as required). After completing the online form, my PIN is displayed, and after a couple of seconds, my phone receives a system text message. Press "Save", enter the PIN, and the phone is set up for the selected service (MMS, internet, WAP, etc).

Subsequently, sending my test MMS (to international number) works without a glitch.

While my phone is now set up as required, the question remains: How can Optus frontline staff possibly not know basic stuff like "your phone needs MMS settings sent by us, let me help you do that?"

Mobile data
Once the Optus config settings for internet access have been sent to the phone, said internet access works well. Speed isn't too impressive; but this is Australia, and given that even our broadband performance is usually listed under in the jokes section of overseas (and domestic) tech mags, this doesn't come as a surprise.

Account admin
To manage your account online, you first have to, well, set up your online account. Contrary to my (perhaps unrealistic) expectations, this does not happen automatically when the friendly Optus store assistant sets up your mobile account.

Once the account is set up, the friendly Login button on the Optus homepage takes you straight to the Login screen (whoda thunk?)

The account dashboard gives a good overview of your activities, as well as quick access to settings, options, extras, etc. It also displays the remaining credit, and of course provides a button to recharge your account.

It is noteworthy that under the convenient Your spend today heading, only the applicable daily level, triggered by outgoing national calls, outgoing national SMS / MMS, or mobile data use, is listed. Items that are charged separately, such as international calls, international messaging, etc, are listed under the Usage details tab. The remaining credit displayed in the summary still takes those separate items into account, though.

The usage details page faithfully lists all activities, both actual use and "technical" events like "Update service" (I'm sure that means something) etc. There's also not as much detail as there could be. All user activities come with a Duration, which for SMS / MMS etc always shows 00:00:00. More concerning, though, is the fact that this Duration info also extends to mobile data items, and not only does it show 00:00:00 instead of the actual duration of the network connection, it also takes up perfectly good space where useful information, such as usage (MB) could be displayed.

The data usage information is indeed nowhere to be found. With low expectations, I try the Live Chat again. Kat, the friendly customer service person listens to my query, then asks me to click on various items. Yes, clicking the item in the usage list does expand the row, but that doesn't reveal the MB usage either. It also becomes clear that the customer service chick isn't looking at the actual screen; if she was, there would be no need for her extensive Please click [something], let's see what happens approach. Eventually, she informs me that the usage "used to be displayed, but has been removed, as IT is working on an upgrade of this page". Of course, upgrades in progress do require the removal of features from the current version! I'm sure there's a universe somewhere where that makes sense.

Kat then offers me to look up the requested information for me, and comes back with how many MB I used during my test the day before. Helpful, but considering that the entire chat has taken about 25 minutes, not really a feasible alternative on a regular basis.

Still on the usage details, another missing feature is downloading the usage data as a cvs file. I must admit that while the Telstra service and products were bad enough to eventually drive me to Optus, their detailed cvs files have been a great help in analyzing my usage pattern.

Account tracking via SMS
When you're away from the interweb and want to quickly check your spending and usage via a good old text message, you can do that, too. There's a range of requests you can text to 9999, but perhaps the most comprehensive option is 1 (yes, just text the number 1 to 9999). Within seconds, you receive a text informing you of your current flat rate level, remaining data quota, remaining talk time, etc. That also means that while your online account won't show your data usage, you can track it via these text messages. You just have to do it on the day, as 9999 provides the current status for the day, no history data.

Previous: Signing up Next: The spam

Saturday, November 8, 2014

The Optus experience – Part 2: Signing up

So, after studying the prices and conditions of the services I'm likely to use most, and after comparing my mobile usage of the past 12 months between my existing plan and this Optus Prepaid Daily plan, I decide to give said Optus plan a go.

There's of course a convenient Buy Now button on the website; but I decide to go old school and do it at the physical shop. That way, I get my SIM straight away, as opposed to sometime between now and the next Melbourne Cup; someone in the store might even be able to clarify the stuff I couldn't find any information about, like the finer points of roaming etc; and the Optus staff can probably do the transfer of my existing phone number from Telstra, too.

So, off to the Optus store in Parramatta, where a sales chick is actually able to clarify some questions regarding roaming (sending MMS from overseas is $ 1.00 per message; roaming can't be disabled, mobile data roaming can't be disabled (must disable mobile data in phone)). However, I later find out that not all her very convincingly presented information is correct; once you have an active account, you actually can disable roaming via the web in the Settings section.

In any case, the actual sign-up process is quick and painless. The friendly shop assistant sets up my account, transfers my number from Telstra in the process, takes my money, and hands me the SIM. Then, she cheerfully informs me that my shiny new Optus SIM will be activated "within 4 hours". Since the old account (in my case Telstra) goes dead pretty much the moment the number is being transferred, this potentially leaves you with a communications black hole for a couple of hours. Definitely something to consider when planning the move from one carrier to another.

In my case, my phone gets an Optus signal after approximately 2 hours. My next post will outline how things go from there.

Previous: Research Next: First steps

Friday, November 7, 2014

The Optus experience - Part 1: Research

I've been looking into the Optus Prepaid Daily" mobile plan. As a very light user, this plan, with a 6 months expiry on credit (as opposed to 30 days with most other plans) and overall reasonable rates, seems to be the right product for me.

Navigating around the Optus website is mostly straight forward; you'll find the product you're after fairly quickly. The basic information regarding voice calls, messaging, and data use within Australia is clearly spelled out. Other items, such as international rates, are listed "somewhere else".

International call rates are easy enough to find. International messaging (SMS / MMS), however, is a different story. No price, no hint as where to find it, not even a link along the lines of "click here for more prices".

With roaming, it's a similar story. It starts out promising enough, with a "see our prepaid roaming rates" link on the product page taking you directly to the, well, roaming page. That's as straight forward as it can be, I give you that (ok, listing the link under the heading Low roaming rates constitutes a blatant lie, but that's a different story).

On the roaming page, you pick the relevant country, and a pop-up window gives you all the rates – well, sort of. The price for MMS to AU number is listed as Standard national MMS rate for your plan. Huh? Under the prepaid plan in question, I get unlimited (national) MMS (and SMS) messages once the daily $ 1.00 has been triggered. Does that mean I can send unlimited MMS to Australian numbers for $ 1.00 per day while I'm overseas? Considering that SMS to AU number is listed at $ 0.50 per message, I find that highly unlikely.

At this stage, I naively decide to give the Optus live chat feature that's so heavily promoted thruout the site a go. Blake, the friendly Optus Sales Consultant, responds quickly, but it's all downhill from there (I should have been warned when he introduced himself as a "consultant"). I put the question regarding SMS / MMS to international numbers to him, and he says he'll be "right with me". What follows are a series of "Thank you for waiting. I'll be right with you" messages (presumably automated), and then … Blake is gone! Disconnected.

Back on the product site, at the very bottom, is the infamous small print. Well, some of it. And among that small print, a link to the Critical Information Summary" (CIS) indicates that all might not be lost after all. The link takes you to the CIS library, rather than to the document that actually applies to the product, and you'll have to find your own way to the document (PDF) that applies to the product of your choice.

Once you have found the relevant CIS, you are rewarded with most of the information you've been looking for. It's all listed right there; non-standard call rates (directory, video calls, premium messages, etc), and International Messaging rates.

The CIS seems to be a pretty comprehensive source of information. It's mind-boggling that it doesn't occur to an Optus sales rep to at least look it up and see if it might answer the questions of the customer they're "helping".

On a side note, the CIS also states that while your credit on the Prepaid Daily plan expires after 6 months, you must recharge at least 30 days before expiry in order to keep the service active. That's not mentioned anywhere on the shiny product page, where the (supposedly) low rates and the long expiration period are advertised. Sneaky bastards!

Despite all this, I decide to go ahead. Read about actually signing up here.

Wednesday, October 29, 2014

Taking photos in Parramatta

Just a heads up to those who consider taking a few photos of the fancy water feature on Parramatta's all-new Centenary Square (aka Church Street Mall):

If there's just one kid, fully dressed, frolicking among the water fountains (say, to cool off on a hot day), some over-protective asshole will call the cops, the boys in blue will come down on you like a ton of bricks, they will take your details, and they will bully you into deleting all the photos you have taken.

To keep all the hysteric, super-PC, hyper-concerned douchebags happy, here's a nighttime photo of said water feature. No kids anywhere, and a shutter speed of 2 minutes has made sure no moving objects, such as persons, remain visible.

Centenary Square

Monday, August 25, 2014

Rhine Falls

At just 23 meters (75 feet), the Rhine Falls are by no means the highest waterfalls. The Swiss Alps alone feature numerous falls that are much higher and, for that matter, probably look more impressive. Still, thanks to a flow rate ranging from 250,000 liters / second (winter) to 600,000 liters / second (summer), these falls are regarded as the "biggest" in Europe.

And that makes them worthy of a couple of photos:

Rhine Falls

Rhine Falls
HDR image by Luminance

Rhine Falls
Panorama image by Hugin

For visitor information, please check out the Rhine Falls official website.

Tuesday, July 1, 2014

Parramatta Winterlight

Once again, Parramatta is putting on the Winterlight Festival. Due to extensive construction work currently in progress in Church Street Mall, the event has been moved to Price Albert Park, and therefore has to do without the impressive backdrop of the illuminated Town Hall building (check out photos from last year here).

Still, the light installation above the ice rink is quite impressive:
Ice rink

There's also a winter bar, a couple (well, three) food stalls, and a giant snow ball for the kids to climb inside. Apart from the ice rink, the event mainly features activities and workshops for kids.

Warm lights around the food stalls add to the cozy atmosphere
Winterlight 2014

At the German hut, you can get some authentic bratwurst for a mere $ 8.
Winterlight 2014

Another food stall
Winterlight 2014


Sunday, June 22, 2014

Bob's Barbershop

Bob's sign


Barbershop parking only

Bob is what you might call an old school barber. He has been in the business for 52 years, starting as an apprentice, then getting his license (back then, you needed one), before taking over the business and buying all the equipment for the grand sum of $ 40.

There's no big menu of options to choose from; Bob's range of services consists of precisely 2 (two) products: Haircut and beard trim. And you won't be charged extra to have your hair cut by the "Senior Art Director"; once you're sitting in that single, 100-year-old barber chair, it is always Bob The Barber who gets to work, because, well, there is just him. And when he's done, that antique cash register will take your money (the whole $ 14.50) even during a power blackout.

In 1980, Bob moved his business in Parramatta from Church Street to Victoria Road, opposite Prince Alfred Park. There, he has been the last shop still operating for at least 5 years now.
Bob's barbershop


At the end of June, Bob will close his door for the last time; the block of shops is due to be demolished so that McDonalds, who owns the site and the building, can extend their car park.

This development has brought Bob to the attention of the local newspaper, and even the TV news found room for a brief segment on this classic, local business.

Bob's barbershop

Fortunately, things have changed slightly since these news items were produced; as it turns out, Bob is not retiring, at least not completely. Instead, Bob is moving his business to 321 Concord Road, Concord West, where he will set up shop in / near his wife's antiques store.

Meanwhile, I've decided to immortalize Bob's old place with a couple of photos before the bulldozers show up:

Bob's barbershop

Bob's barbershop

Bob's barbershop

Bob's barbershop

Bob's barbershop

Wednesday, May 7, 2014

Fixing wide-angle distortions with Hugin

Note: Hugin is a free cross-platform image processing tool, so this may be of interest to you even if you're using Windows or Mac.

Hugin is best known as a great tool to create panorama images from multiple photos; after all, the full title of the software product is Hugin – Panorama photo stitcher.

Another, not so widely known use of the same application is correcting distortions of wide-angle photos. When shooting with a wide-angle lens, you invariably end up with vertical lines leaning back, leaning to the side, or even "falling in" on the observer. While this keystone effect can enhance the impact of an photograph and is sometimes consciously included in the composition of an image for artistic effect, it often simply distracts the viewer, when you simply want to show a building or a city street "as is" and are using a wide-angle lens purely for practical purposes.

There's an extensive tutorial on the subject on the Hugin website, on which I've based my tests and the following notes.

The process of correcting those "falling" vertical lines essentially includes 2 basic steps:
1) Define lines that are supposed to be perpendicular
2) Distort the image so that these defined lines actually become perpendicular

Let's do this with this image:
Original wide angle photo

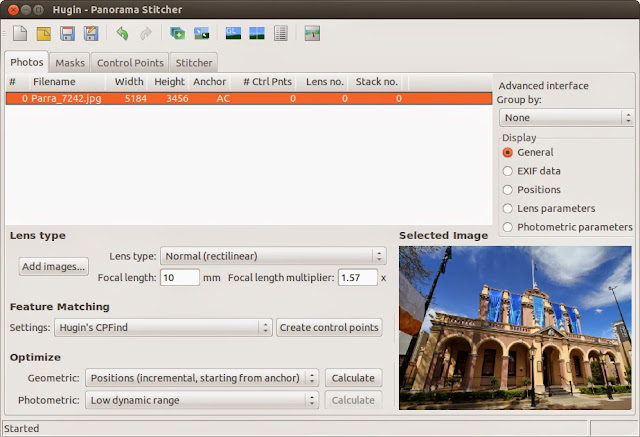
1) Load the image into Hugin, just as you would load any sequence of photos to create a panorama image.
Add image

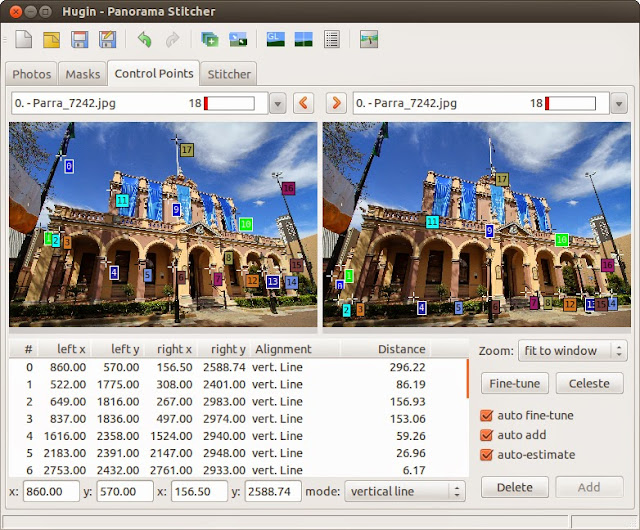
2) Set the control points. This is where you spend most of your time, this is the step that takes some real, manual work.

Make sure that Auto add is set. To start with, make sure Zoom is set to fit to window (you may need to temporarily change this to 100 % in order to get the exact positioning of some control points perfectly right).

To set the control points, pick a vertical feature in the left copy of the image and set a control point at one end. Then, set the corresponding control point at the other end of that vertical feature in the right copy of the image.

Ideally, you define your vertical features spread over the whole image, from left to right, and both in the top and the bottom section. This will allow Hugin to correctly calculate the correct distortion for the whole image; if you only define vertical lines in the left half of the image, Hugin has no way of knowing that there are also vertical lines in the right half, leaning in a different direction.
Set control points

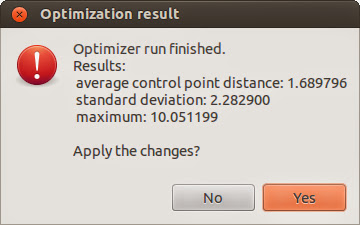
3) Click the Optimize button
Optimize

This will, well, optimize your control points. When done, apply the result of the optimization process:
Optimize completed

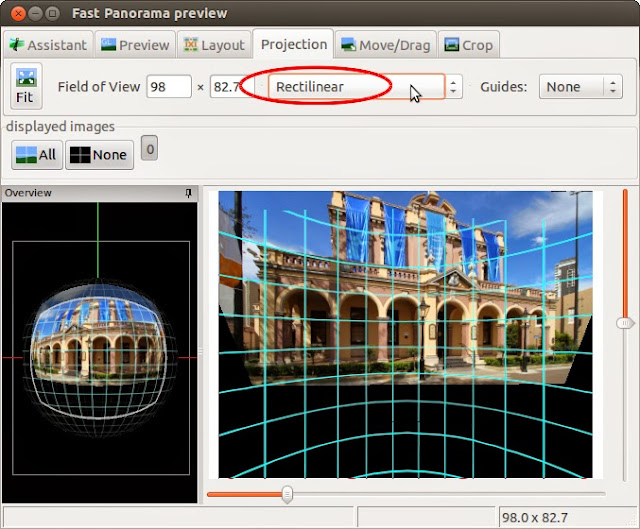
4) Open the Fast preview window:
Open Quick Preview

5) In the Projection tab, set projection type to Rectilinear.
Projection

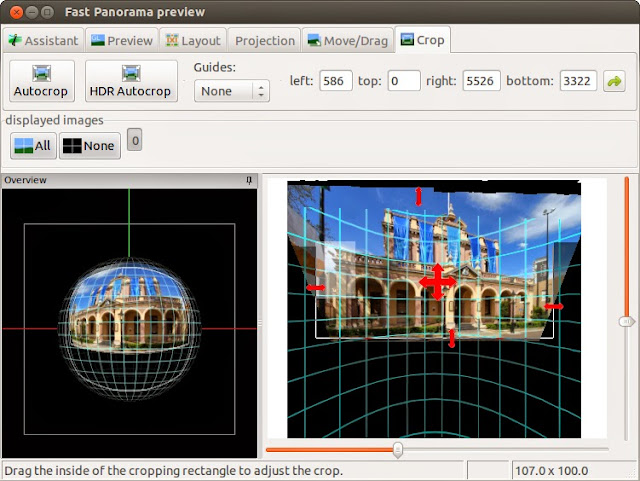
6) In the Crop tab, drag the boundaries to adjust the crop area.
Crop

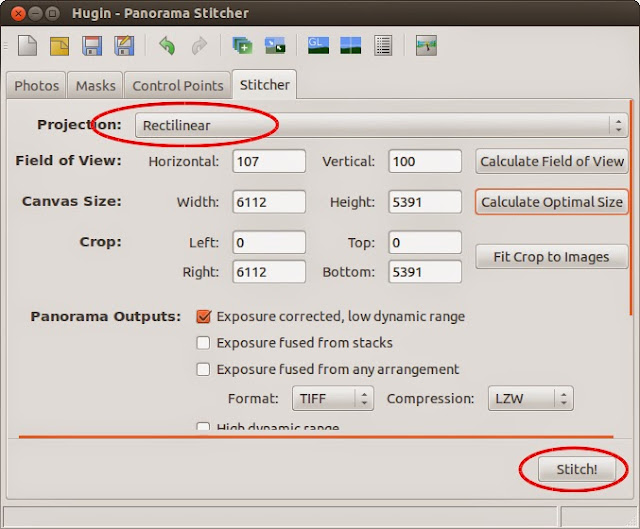
7) Create the corrected image. Since Hugin's primary function is to stitch multiple photos together to create panorama images, the final step of the process is called Stitch even though with only 1 image, you don't actually have anything to stitch together.

With that in mind, switch to the Stitch tab, make sure that Projection is set to Rectilinear, and click the Stitch button to let Hugin do its magic.
Stitcher

There you have it; one wide-angle picture with perfectly perpendicular vertical lines:
Modified by Hugin

Below are some more examples;

Original wide angle photo Modified by Hugin

Original wide angle photo Modified by Hugin

Original wide angle photo Modified by Hugin

Original wide angle photo Modified by Hugin

Original wide angle photo
Modified by Hugin

Monday, May 5, 2014

Video editing with Ubuntu

AVI Demux video editor
Avidemux is a free video editor designed for simple cutting, filtering and encoding tasks. The user interface doesn't exactly make this the ideal tool for complex editing (for instance, there's no "timeline" to arrange your clips), it does provide a good range of filters, resizing options, etc, it allows frame-accurate navigation thru your video, and individual frames can be saved as *.jpg images.

Most importantly, however, Avidemux makes it easy to create time-lapse videos from individual photos. As long as your image files are named sequencially (e. g. image0001.jpg, image0002.jpg, image0003.jpg, …), you simply drop the first one into Avidemux, and the software uses all subsequent image files in that folder to generate the video file.

Installation
Via Synaptic Package manager

Openshot video editor
Openshot provides plenty of options and flexibility even for relatively complex video editing tasks, including speed changes (something I haven't found in too many other free video editing tools).

Installation
sudo add-apt-repository ppa:openshot.developers/ppa
sudo apt-get update
sudo apt-get install openshot openshot-doc

Saturday, May 3, 2014

Photo processing with Ubuntu

Image manipulation with GIMP
Many would describe GIMP as the Open Source answer to Photoshop. While it may not include every last obscure feature of Photoshop, I found that it provides pretty much everything I need for my basic amateurish everyday photo processing.

Installation
Note Despite claims to the contrary, neither the installation instructions from the GIMP homepage nor the package retrieved by Synaptic Package Manager installed the latest version (2.8) on my system. Some research revealed that to actually install version 2.8, it needed to be done from a third party PPA, which first needs to be added to your system:

sudo add-apt-repository ppa:otto-kesselgulasch/gimp
sudo apt-get update
sudo apt-get install gimp

Batch photo processing
Phatch allows the bulk manipulation of images, modifying the actual photos as well as editing meta data (Click here for the full list of actions)

Phatch also comes with Phatch Image Inspector, which allows you to easily view all the EXIF tags of one or more image files.

Installation
Via Synaptic package manager

Hugin Panorama stitcher
Just what the title says, Hugin lets you stitch together a number of individual photos to create one big panorama picture. The software can also handle multiple rows of images, and it can be used on single images to correct falling lines on wide angle photos ("Keystoning effect").

Installation
sudo add-apt-repository ppa:hugin/hugin-builds
sudo apt-get update
sudo apt-get install hugin enblend panini

Luminance HDR
Luminance HDR lets you process a series of photos to generate a High Dynamic Rrange image.

Installation
1) Download *.deb file from http://www.ubuntuupdates.org/package/getdeb_apps/precise/apps/getdeb/luminance
2) Open downloaded *.deb file in GDebi Package Installer

Friday, May 2, 2014

Multimedia applications for Ubuntu

Media player
The VLC player is one of the most reliable and most versatile media players available.

Installation
sudo apt-get update
sudo apt-get install vlc browser-plugin-vlc

CD Ripper
Asunder is a graphical Audio CD ripper and encoder. It can be used to save tracks from Audio CDs.

Installation
Via Synaptic Package Manager

Note for the public record: Columbo does not condone "illegal" copying of copyright-protected content, regardless of how outdated the laws on intellectual property, how unfair any "fair use" policy stated in those laws, or how inadequate legal access to your favorite music and other audio content might be in your country.

Audio editor
Audacity is a free, open source, cross-platform software for recording and editing sounds.

Installation
Via Synaptic Package Manager

Thursday, May 1, 2014

Ubuntu online / communication tools

A couple of online / communication related tools for Ubuntu.

Note: In addition to Mozilla Firefox which comes with Ubuntu, most other popular web browsers are also available for Ubuntu. I won't go thru the details of installing the various browsers, as they can easily be found and set up. When in doubt, I recommend starting here.

Email
If you're unhappy with Thunderbird, Evolution may be the alternative for you.

Installation
Via Synaptic Package Manager

Skype
Skype client for Ubuntu

Installation, as per this site

On Ubuntu 32bit:
wget -O skype.deb http://download.skype.com/linux/skype-ubuntu_4.0.0.8-1_i386.deb
sudo apt-get install libxss1
sudo dpkg -i skype.deb
sudo apt-get -f install && rm skype.deb

On Ubuntu 64bit:
wget -O skype.deb http://download.skype.com/linux/skype-ubuntu_4.0.0.8-1_amd64.deb
sudo apt-get install libxss1 lib32stdc++6 lib32asound2 ia32-libs libc6-i386 lib32gcc1
sudo dpkg -i skype.deb
sudo apt-get -f install && rm skype.deb

Deluge bit torrent client
Deluge is an easy to use bit-torrent client.

Installation
Via Synaptic Package Manager
or
sudo apt-get update
sudo apt-get install deluge

Note for the public record: Columbo does not condone "illegal" downloading of copyright-protected content, regardless of how outdated the laws on intellectual property, how unfair any "fair use" policy stated in those laws, or how inadequate legal access to your favorite music, TV shows, and movies might be in your country.

Wednesday, April 30, 2014

Useful tools for Ubuntu

These are some of the tools I found to be useful. This list is far from being comprehensive; depending on what you're up to, you might still have to search for the tools you need, but I suppose this is a good start.

Installing new tools and applications
Most tools can be installed via Ubuntu's Software Center or other package managers. Sometimes, however, you're left with just the command line install instructions:

The line commands needed to update / install software need to be run under the root user. To do that, the command needs to be preceded by the keyword sudo

If the tool isn't in one of the software repositories available to your system, the repository it belongs to must be added before you can actually install the software:

sudo add-apt-repository ppa:[repository name].

If this is necessary, the add-apt-repository command, includingthe actual repository name, usually comes with the installation instructions.


It is good practice to update the package information before running any installation process:

sudo apt-get update

Note that this does not actually update any components of your system, it merely updates the list of available packages and their versions.


The following command actually installs your tool / application:

sudo apt-get install [softwarename]

So, let's add some software:

Synaptic Package Manager
Install, update, and remove software packages via a convenient GUI
Synaptic Package Manager home page

Installation
Via Ubuntu software center

GDebi Package installer
Another useful package installer
GDebi package installer homepage

Installation
Via Ubuntu software center

MAC Changer
If you wish to hide your computer's identity, be it for privacy reasons or simply to circumvent the time limit of a public WiFi hotspot, you need to change the MAC address your computer is broadcasting to the world. MACChanger is a command-line tool that does exactly that.

See also my earlier post regarding this tool

Installation
sudo apt-get update
sudo apt-get install macchanger

DConf editor
DConf is a basic key / value database where desktop environment settings are stored. DConf Editor allows you to view and modify these settings (see also the section on file explorer settings in my post on setting up Ubuntu).

Installation
sudo apt-get update)
sudo apt-get install dconf-tools

LibreOffice
The LibreOffice version included in your Ubuntu distribution may be outdated; check for updates (for example via Synaptic Package Manager).

Extensions
The basic functionality of LibreOffice can be extended according to your specific needs by installing, well, extensions. Dictionaries are part of the extensions set, so you may need to deal with extensions even if all you want to do is type (and spell-check) the occasional document in a language other than standard US English.

Extensions can be found here; this site can also be accessed directly via the Extensions dialog within LibreOffice (Tools --> Extension Manager).

To install an extension pack:
1) Download extension pack file (*.oxt)
2) Install via the Add... button in the LibreOffice Extension Manager (Tools --> Extension Manager)

That's all for today; I shall recommend a few more useful applications later.

Tuesday, April 29, 2014

Ubuntu file explorer preferences

While most file explorer settings are managed via the File Management Preferences dialog (Menu edit -> Preferences, some can only be changed directly in the DConf database. DConf is a simple key/value database to manage system settings as well as settings for tools and some applications.

You can edit the DConf via the accurately named DConf editor. Unfortunately this handy tool isn't part of the Ubuntu 12.04 setup, so you need to install it first:

sudo apt-get update
sudo apt-get install dconf-tools

There's one file explorer setting in particular that not only is not accessible via the Preferences dialog, but is also set by default to a setting that most users probably want to change.

By default, the file explorer displays the path to your current location as a series of buttons.

File explorer window with directory path buttons

While these buttons allow you to quickly jump up and down as many levels of the hierarchy as you like, they of course won't let you directly type in a directory location, nor can you paste a file path from the clipboard, or copy the path to your current directory to the clipboard.

You might therefore prefer the more traditional text box that allows you do exactly that.

To change the file explorer navigation from buttons to location entry

1) Open the DConf editor

2) Navigate to org -> gnome -> nautilus -> preferences

3) Tick the checkbox of the always-use-location-entry parameter

DConf Editor

There you have it; the directory location input control just like you remember it from the operating system that shall not be named.

File explorer window with directory path input

Monday, April 28, 2014

Installing Ubuntu

After a recent SNAFU provided the opportunity to rebuild my Ubuntu machine from scratch, I decided that this time around, I might as well keep track of what I'm installing. So, here we go, starting with, well, the actual operating system.

So, I'm installing Ubuntu 12.04 on ye olde Lenovo ThinkPad T60, with 1 GB of RAM and a 60 GB hard drive.

On a side note, I'm by no means an expert on this; if you notice any obvious (or even just subtle) errors or mistakes, please let me know.

You can find the minimum requirements to install and run the operating system here. For Ubuntu 12.04, these requirements are
64 MB RAM (512 MB recommended)
5 GB Hard Drive

Download Ubuntu
Download the current version here. Be sure to pick the right version (32 bit vs 64 bit). This download provides an iso file that allows you to create the installation CD.

Once downloaded, burn the iso file onto a recordable optical disk.

Note The iso file for Ubuntu 12.04 is 731 MB big, so you need to make sure you're using a blank CR-R that can actually take that much data (the capacity of a standard CD-R is 700 MB), and use a CD burner and software that feature the overburn option. Alternatively, you may want to burn the iso file onto a recordable DVD, just to be on the safe side.

Install Ubuntu
1) Boot the computer with your brand new Ubuntu installation disk in the CD/DVD drive (depending on your computer, you may have to manually interrupt the boot process and direct it to boot from the CD/DVD drive. The installation disk provides 3 options:

Install Ubuntu as the only system on the maching. Any data that might sit on the hard disk will be erased, the entire hard disk will become part of the Ubuntu environmental

Install Ubuntu on a separate partition. Alternatively, you can create a new partition just for Ubuntu, while leaving, for instance, your Windows environment intact. This will give you a dual-boot machine where you can run either Ubuntu or whatever other operating system you have already installed there. Obviously, for this option, your hard drive needs to be big enough to support both operating systems.

Explore Ubuntu from CD If you're not ready to commit just yet, you can start Ubuntu from the installation disk, explore the features and tools, all without making any change whatsoever to your computer.

Ideally, your computer is connected to the internet while you run the installation process, this allows Ubuntu to download any updates that may not have been included in the release provided with the iso file as part of that installation process.

Post installation updates
Even if you ran the installation process while connected to the internet and the option Download available updates selected, the first thing to pop up after starting your brand new Ubuntu system for the first time may still be the Update Manager. So you may spend some more time letting that Update Manager do its job, that way you're at least certain that your system is well and truly up to date.

First steps
If you intend to run Ubuntu with a dual screen setup (or with a single big-ass monitor), you will need to switch to Ubuntu 2D, as Ubuntu 3D supports only a very limited maximum screen size. To switch between 2D and 3D, click the little Ubuntu logo next to your user name on the login screen.

Ubuntu comes with a range of tools and applications, so you're pretty much good to go. The following list is by no means exhaustive, it just features some of the tools that may help you with your most common everyday tasks:

Mozilla's Firefox web browser. As with all applications, you may want to check for updates, as the Ubuntu distribution may not include the latest version. I'm mentioning this here specifically because the Firefox version that came with my Ubuntu download was very outdated.

Mozilla's Thunderbird email client

LibreOffice Office suite, featuring a word processor, spreadsheet application, and presentation / slideshow tool. And yes, they can handle (and create) Microsoft Office files). Additional applications are available and free, too.

Rhythmbox Music player

Movie player. It plays videos (well what did you expect)

Brasero Disk burner

GEdit text editor

Ubuntu One
For those who are keen to share their content with the NSA and other cyber-scum, Ubuntu used to provide (and still includes the tool in its current distribution) the Ubuntu One cloud service and online music store. However, this notification informs us that Ubuntu One will be shut down from June 1, 2014. So, if you're reading this before that date, it's probably best not to bother.

Saturday, March 22, 2014

The Queen Mary 2 in Sydney

About a week ago, the Queen Mary 2, shipping company Cunard Line's flagship once again visited Sydney. The 151,400 ton ship is 345 meters (1,132 ft) long, 41 meters (135 ft) wide (45 m / 147 ft 6 in) at bridge wings), and with a height of 72 meters (236 ft 2 in), it's too high to fit under the Sydney Harbor bridge.

14 of the 17 decks are available to the guests / passengers. The maximum capacity is 3,090 passengers, with a crew of 1,288 looking after the guests and running the ship.

Further technical data and key figures are available on this technical fact sheet (PDF).

You can also explore the QM2's deck plans (PDF).

And now, as you've probably guessed already, I'm gonna show off some of the photos I took during the QM2's visit:

Queen Mary 2

Queen Mary 2

Queen Mary 2


Note: Photos have been processed with GIMP; composite images have been created with Hugin.

Monday, March 3, 2014

What to do

A couple of weeks ago, my DVR went from highly unreliable to completely useless, but miraculously came back to life after some serious pretend-repairing and looking at it very sternly.

Now, the unit's remote control has followed the recorder's example and, after a few days of constantly deteriorating performance, is now refusing to work at all. No amount of feeding it posh top-brand batteries with fancy words like performance and extreme in the name, gently stroking the buttons, creating an intimate atmosphere by holding the bloody thing really close to the recorder, or waving a stick at it while shouting "Remotus Reparo" seems to coax it back to life.

To make matters worse, the recorder itself features only the most basic set of controls. There's the Power button, a pair of buttons to change the TV channels (up / down), and volume control. That's it. So, without a working remote, it's possible to watch live TV via the recorder, but setting up new recordings, or accessing any of the recorded content, is out of the question.

So, there's the option to buy a new remote control. That's AUD 50 (or thereabouts) on an accessory for a fairly old-ish DVR that, while it's essentially working again, hasn't been quite the same since that near death experience (channel changes take about 4 times as much time as they did originally, and a few channels can no longer be recorded properly), and may die for good any day.

Or I take the hint and spend money on a brand new recorder, probably from a more reliable manufacturer, consigning ye olde Topfield to the council's next available bulk garbage collection, all because of that pesky remote.

What to do, what to do … I'm open to suggestions.

Saturday, March 1, 2014

How to spoof a MAC address

The Media Access Control address is a unique identifier assigned to network interfaces (For more details, see the ever reliable Wikipedia or ask Google). The MAC address is hard-coded on the Network Interface Controller (NIC). Consequently, it always remains the same, no matter where in the world you connect to the internet, and regardless of any VPN and / or proxys you might use.

You can, however, make your operating system (and subsequently the LAN you're connecting to) believe that your NIC has a MAC address of your choosing (or a randomly generated one, for that matter), rather then the one hard-coded on said NIC.

Perhaps the end user agreement of a web-based service you've subscribed to only allows you to connect a limited number of devices (or even just one), and you need to connect your new computer.

Perhaps you want to hide your identity (and that of your computer) in order to protect your privacy.

Perhaps the time-limit of the public hot spot you're using has expired (airports, public transport, coffee shops, etc), and you need to convince the public WLAN that you're connecting with an entirely new device.

Whatever your reasons may be, I won't judge you, I'm just going to show you how to do it.

Install MAC address change tool

A Google search for "MACChanger" lets you find the necessary tool for your operating system.

For Windows, you can download it here, for example.

On Ubuntu 12.04, install MAC changer using this command:

sudo apt-get install macchanger

Spoof a MAC address

Note The following process has been tested on a Ubuntu 12.04 system. For the procedure and syntax applying to your operating system, refer to the instructions on the download site you obtained MAC changer from.

First, you must stop the network manager service:
sudo service network-manager stop

Now, run MAC changer. This example generates a fully random MAC address for your wireless network interface:
sudo macchanger -r wlan0.

To spoof a MAC address for the ethernet network interface, use eth0 as the device identifier.

sudo macchanger -h lists the available options. They are:
-h Help Show summary of options
-V Version Show version of MAC changer
-e Ending Don't change the vendor bytes (e. g. your Cisco NIC will still show up as an Cisco NIC)
-a another Set random MAC address of the same kind
-A Another Set random MAC address of any kind
-p Permanent Reset to original, permanent hardware MAC address
-r Random Set fully random MAC address
-l List List known vendors
-m MAC Set MAC to specific MAC address: macchanger -m XX:XX:XX:XX:XX:XX

Finally, restart the network manager service:
sudo service network-manager start

Note that after shutting down and restarting your system, the operating system will once again broadcast the original, hard-coded MAC address of your NIC to the world.

To restore the original MAC address without rebooting, use
sudo macchanger -p wlan0.

Congrats, you're done

So there you have it. Never get bored to death again when the airport gives you a measly one hour of WiFi connectivity but your flight has just been delayed indefinitely. Now all you have to do is install MACChanger before you get kicked off the WLAN you're using, and Bob's your uncle.

Thursday, January 30, 2014

Australia Day 2014 fireworks display at Parramatta

Immediately after Jessica Mauboy finished her concert, the fireworks display marked the official end of the festivities with a bang or two.

Fireworks

Fireworks

Fireworks

Fireworks

Fireworks


Wednesday, January 29, 2014

Australia Day 2014 concert

As usual, Parramatta had booked a first class act to conclude the local Australia Day festivities. After performing in the city earlier in the day, Jessica Mauboy headlined the traditional evening concert at Parramatta Park.

Jessica Mauboy in concert at Parramatta Park

Jessica Mauboy

Jessica Mauboy

Jessica Mauboy and backup singers

Jessica Mauboy

And the cops kept a close eye on proceedings
Cops at Jessica Mauboy concert