Showing posts with label IT. Show all posts

Wednesday, May 7, 2014

Fixing wide-angle distortions with Hugin

Note: Hugin is a free cross-platform image processing tool, so this may be of interest to you even if you're using Windows or Mac.

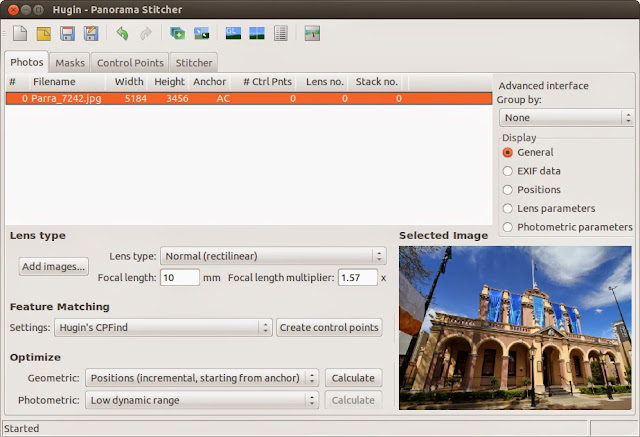
Hugin is best known as a great tool to create panorama images from multiple photos; after all, the full title of the software product is Hugin – Panorama photo stitcher.

Another, not so widely known use of the same application is correcting distortions of wide-angle photos. When shooting with a wide-angle lens, you invariably end up with vertical lines leaning back, leaning to the side, or even "falling in" on the observer. While this keystone effect can enhance the impact of an photograph and is sometimes consciously included in the composition of an image for artistic effect, it often simply distracts the viewer, when you simply want to show a building or a city street "as is" and are using a wide-angle lens purely for practical purposes.

There's an extensive tutorial on the subject on the Hugin website, on which I've based my tests and the following notes.

The process of correcting those "falling" vertical lines essentially includes 2 basic steps:
1) Define lines that are supposed to be perpendicular
2) Distort the image so that these defined lines actually become perpendicular

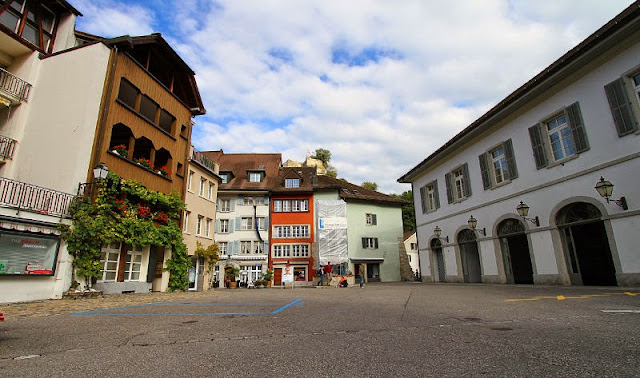
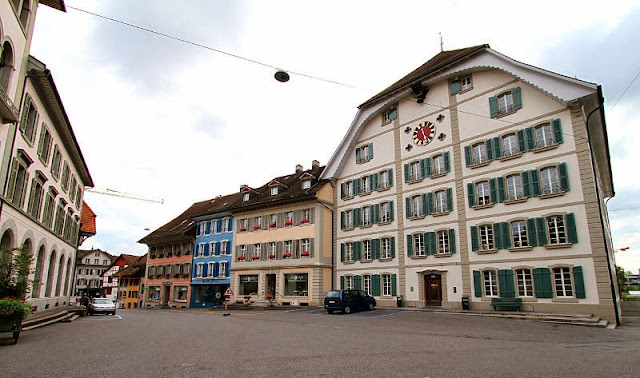
Let's do this with this image:
Original wide angle photo

1) Load the image into Hugin, just as you would load any sequence of photos to create a panorama image.
Add image

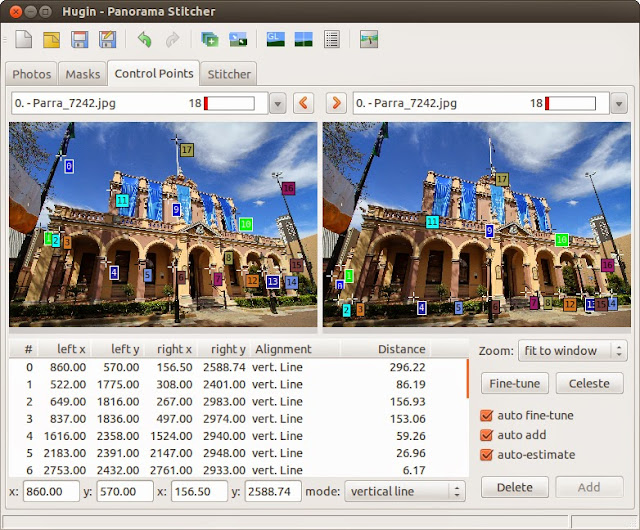
2) Set the control points. This is where you spend most of your time, this is the step that takes some real, manual work.

Make sure that Auto add is set. To start with, make sure Zoom is set to fit to window (you may need to temporarily change this to 100 % in order to get the exact positioning of some control points perfectly right).

To set the control points, pick a vertical feature in the left copy of the image and set a control point at one end. Then, set the corresponding control point at the other end of that vertical feature in the right copy of the image.

Ideally, you define your vertical features spread over the whole image, from left to right, and both in the top and the bottom section. This will allow Hugin to correctly calculate the correct distortion for the whole image; if you only define vertical lines in the left half of the image, Hugin has no way of knowing that there are also vertical lines in the right half, leaning in a different direction.
Set control points

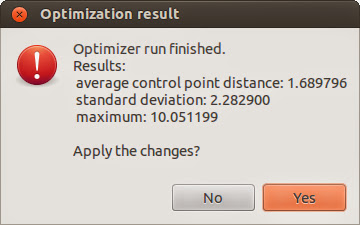
3) Click the Optimize button
Optimize

This will, well, optimize your control points. When done, apply the result of the optimization process:
Optimize completed

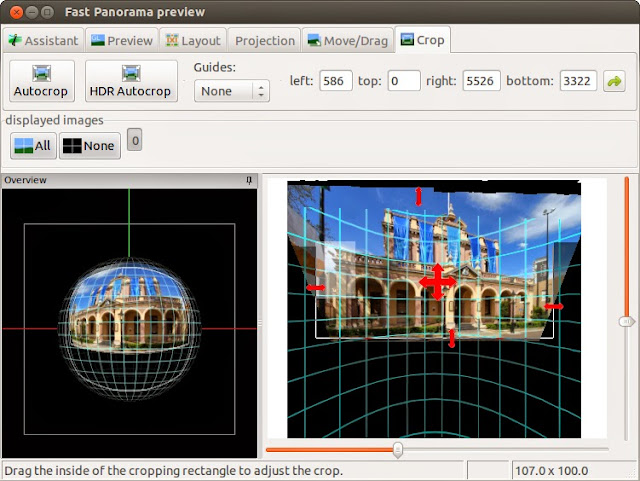
4) Open the Fast preview window:
Open Quick Preview

5) In the Projection tab, set projection type to Rectilinear.
Projection

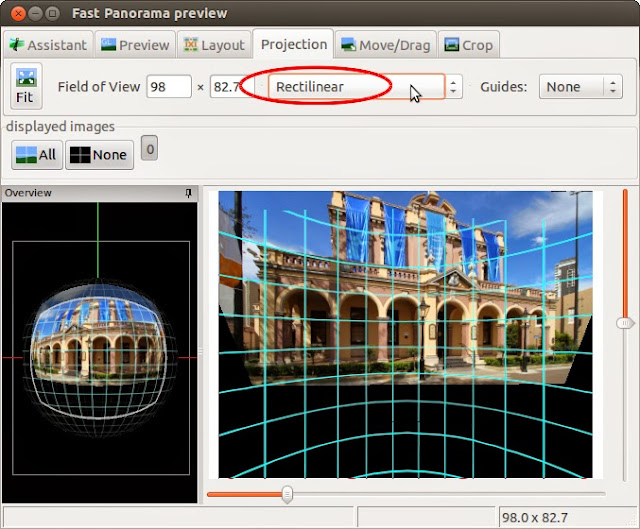
6) In the Crop tab, drag the boundaries to adjust the crop area.
Crop

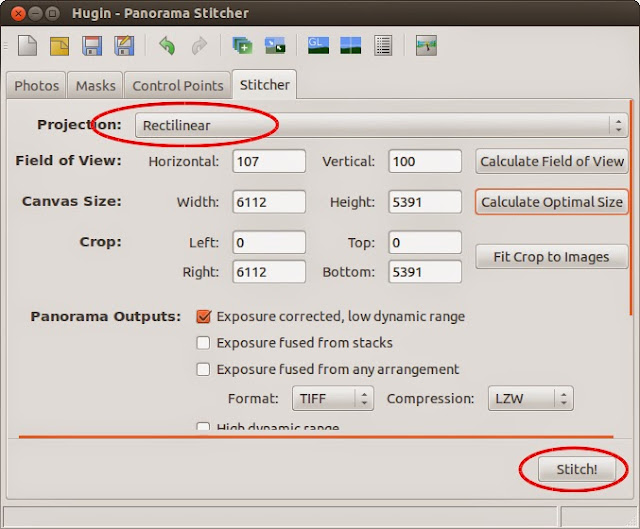
7) Create the corrected image. Since Hugin's primary function is to stitch multiple photos together to create panorama images, the final step of the process is called Stitch even though with only 1 image, you don't actually have anything to stitch together.

With that in mind, switch to the Stitch tab, make sure that Projection is set to Rectilinear, and click the Stitch button to let Hugin do its magic.
Stitcher

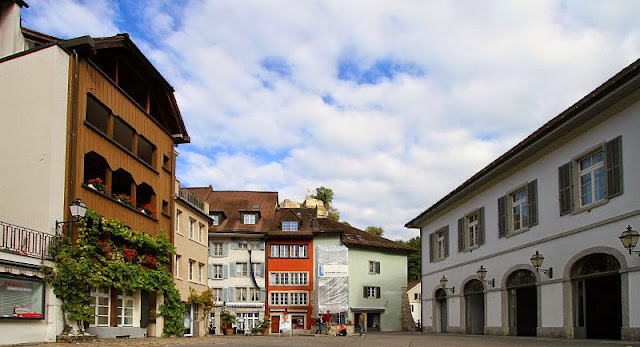
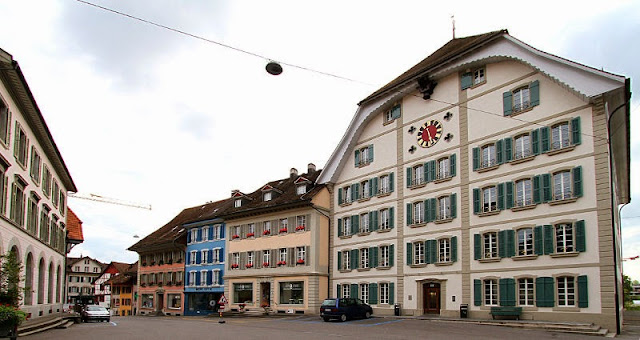
There you have it; one wide-angle picture with perfectly perpendicular vertical lines:
Modified by Hugin

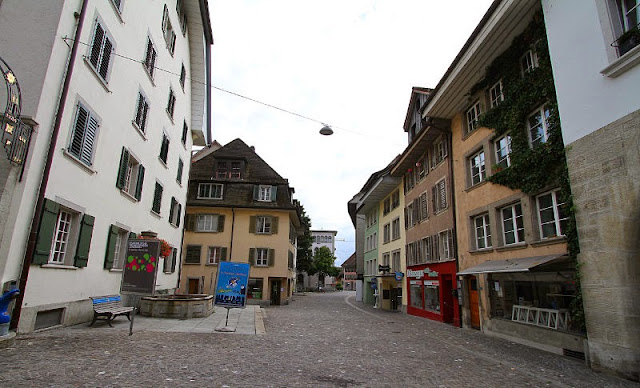
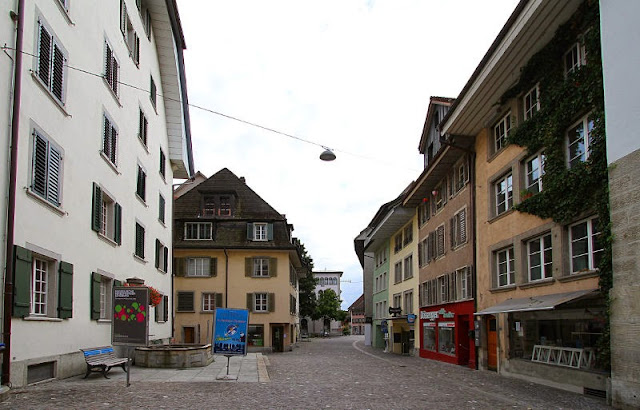
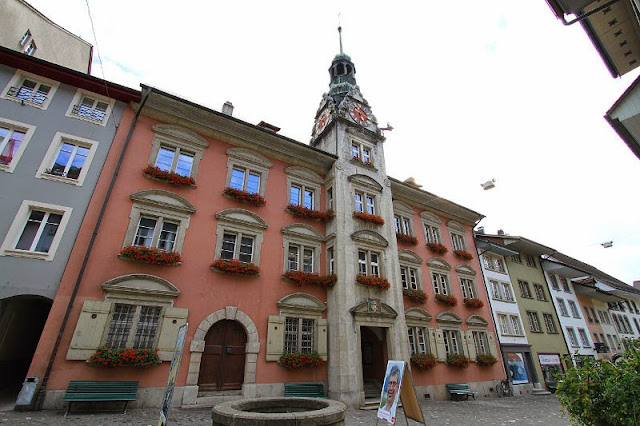
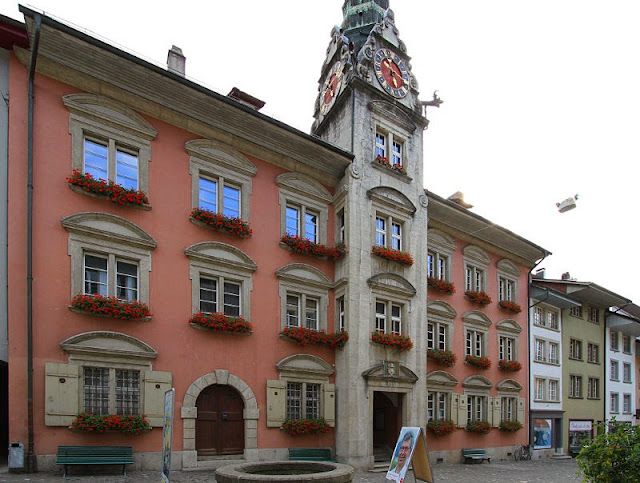
Below are some more examples;

Original wide angle photo Modified by Hugin

Original wide angle photo Modified by Hugin

Original wide angle photo Modified by Hugin

Original wide angle photo Modified by Hugin

Original wide angle photo
Modified by Hugin

Monday, May 5, 2014

Video editing with Ubuntu

AVI Demux video editor
Avidemux is a free video editor designed for simple cutting, filtering and encoding tasks. The user interface doesn't exactly make this the ideal tool for complex editing (for instance, there's no "timeline" to arrange your clips), it does provide a good range of filters, resizing options, etc, it allows frame-accurate navigation thru your video, and individual frames can be saved as *.jpg images.

Most importantly, however, Avidemux makes it easy to create time-lapse videos from individual photos. As long as your image files are named sequencially (e. g. image0001.jpg, image0002.jpg, image0003.jpg, …), you simply drop the first one into Avidemux, and the software uses all subsequent image files in that folder to generate the video file.

Installation
Via Synaptic Package manager

Openshot video editor
Openshot provides plenty of options and flexibility even for relatively complex video editing tasks, including speed changes (something I haven't found in too many other free video editing tools).

Installation
sudo add-apt-repository ppa:openshot.developers/ppa
sudo apt-get update
sudo apt-get install openshot openshot-doc

Saturday, May 3, 2014

Photo processing with Ubuntu

Image manipulation with GIMP
Many would describe GIMP as the Open Source answer to Photoshop. While it may not include every last obscure feature of Photoshop, I found that it provides pretty much everything I need for my basic amateurish everyday photo processing.

Installation
Note Despite claims to the contrary, neither the installation instructions from the GIMP homepage nor the package retrieved by Synaptic Package Manager installed the latest version (2.8) on my system. Some research revealed that to actually install version 2.8, it needed to be done from a third party PPA, which first needs to be added to your system:

sudo add-apt-repository ppa:otto-kesselgulasch/gimp
sudo apt-get update
sudo apt-get install gimp

Batch photo processing
Phatch allows the bulk manipulation of images, modifying the actual photos as well as editing meta data (Click here for the full list of actions)

Phatch also comes with Phatch Image Inspector, which allows you to easily view all the EXIF tags of one or more image files.

Installation
Via Synaptic package manager

Hugin Panorama stitcher
Just what the title says, Hugin lets you stitch together a number of individual photos to create one big panorama picture. The software can also handle multiple rows of images, and it can be used on single images to correct falling lines on wide angle photos ("Keystoning effect").

Installation
sudo add-apt-repository ppa:hugin/hugin-builds
sudo apt-get update
sudo apt-get install hugin enblend panini

Luminance HDR
Luminance HDR lets you process a series of photos to generate a High Dynamic Rrange image.

Installation
1) Download *.deb file from http://www.ubuntuupdates.org/package/getdeb_apps/precise/apps/getdeb/luminance
2) Open downloaded *.deb file in GDebi Package Installer

Friday, May 2, 2014

Multimedia applications for Ubuntu

Media player
The VLC player is one of the most reliable and most versatile media players available.

Installation
sudo apt-get update
sudo apt-get install vlc browser-plugin-vlc

CD Ripper
Asunder is a graphical Audio CD ripper and encoder. It can be used to save tracks from Audio CDs.

Installation
Via Synaptic Package Manager

Note for the public record: Columbo does not condone "illegal" copying of copyright-protected content, regardless of how outdated the laws on intellectual property, how unfair any "fair use" policy stated in those laws, or how inadequate legal access to your favorite music and other audio content might be in your country.

Audio editor
Audacity is a free, open source, cross-platform software for recording and editing sounds.

Installation
Via Synaptic Package Manager

Thursday, May 1, 2014

Ubuntu online / communication tools

A couple of online / communication related tools for Ubuntu.

Note: In addition to Mozilla Firefox which comes with Ubuntu, most other popular web browsers are also available for Ubuntu. I won't go thru the details of installing the various browsers, as they can easily be found and set up. When in doubt, I recommend starting here.

Email
If you're unhappy with Thunderbird, Evolution may be the alternative for you.

Installation
Via Synaptic Package Manager

Skype
Skype client for Ubuntu

Installation, as per this site

On Ubuntu 32bit:
wget -O skype.deb http://download.skype.com/linux/skype-ubuntu_4.0.0.8-1_i386.deb
sudo apt-get install libxss1
sudo dpkg -i skype.deb
sudo apt-get -f install && rm skype.deb

On Ubuntu 64bit:
wget -O skype.deb http://download.skype.com/linux/skype-ubuntu_4.0.0.8-1_amd64.deb
sudo apt-get install libxss1 lib32stdc++6 lib32asound2 ia32-libs libc6-i386 lib32gcc1
sudo dpkg -i skype.deb
sudo apt-get -f install && rm skype.deb

Deluge bit torrent client
Deluge is an easy to use bit-torrent client.

Installation
Via Synaptic Package Manager
or
sudo apt-get update
sudo apt-get install deluge

Note for the public record: Columbo does not condone "illegal" downloading of copyright-protected content, regardless of how outdated the laws on intellectual property, how unfair any "fair use" policy stated in those laws, or how inadequate legal access to your favorite music, TV shows, and movies might be in your country.

Wednesday, April 30, 2014

Useful tools for Ubuntu

These are some of the tools I found to be useful. This list is far from being comprehensive; depending on what you're up to, you might still have to search for the tools you need, but I suppose this is a good start.

Installing new tools and applications
Most tools can be installed via Ubuntu's Software Center or other package managers. Sometimes, however, you're left with just the command line install instructions:

The line commands needed to update / install software need to be run under the root user. To do that, the command needs to be preceded by the keyword sudo

If the tool isn't in one of the software repositories available to your system, the repository it belongs to must be added before you can actually install the software:

sudo add-apt-repository ppa:[repository name].

If this is necessary, the add-apt-repository command, includingthe actual repository name, usually comes with the installation instructions.


It is good practice to update the package information before running any installation process:

sudo apt-get update

Note that this does not actually update any components of your system, it merely updates the list of available packages and their versions.


The following command actually installs your tool / application:

sudo apt-get install [softwarename]

So, let's add some software:

Synaptic Package Manager
Install, update, and remove software packages via a convenient GUI
Synaptic Package Manager home page

Installation
Via Ubuntu software center

GDebi Package installer
Another useful package installer
GDebi package installer homepage

Installation
Via Ubuntu software center

MAC Changer
If you wish to hide your computer's identity, be it for privacy reasons or simply to circumvent the time limit of a public WiFi hotspot, you need to change the MAC address your computer is broadcasting to the world. MACChanger is a command-line tool that does exactly that.

See also my earlier post regarding this tool

Installation
sudo apt-get update
sudo apt-get install macchanger

DConf editor
DConf is a basic key / value database where desktop environment settings are stored. DConf Editor allows you to view and modify these settings (see also the section on file explorer settings in my post on setting up Ubuntu).

Installation
sudo apt-get update)
sudo apt-get install dconf-tools

LibreOffice
The LibreOffice version included in your Ubuntu distribution may be outdated; check for updates (for example via Synaptic Package Manager).

Extensions
The basic functionality of LibreOffice can be extended according to your specific needs by installing, well, extensions. Dictionaries are part of the extensions set, so you may need to deal with extensions even if all you want to do is type (and spell-check) the occasional document in a language other than standard US English.

Extensions can be found here; this site can also be accessed directly via the Extensions dialog within LibreOffice (Tools --> Extension Manager).

To install an extension pack:
1) Download extension pack file (*.oxt)
2) Install via the Add... button in the LibreOffice Extension Manager (Tools --> Extension Manager)

That's all for today; I shall recommend a few more useful applications later.

Tuesday, April 29, 2014

Ubuntu file explorer preferences

While most file explorer settings are managed via the File Management Preferences dialog (Menu edit -> Preferences, some can only be changed directly in the DConf database. DConf is a simple key/value database to manage system settings as well as settings for tools and some applications.

You can edit the DConf via the accurately named DConf editor. Unfortunately this handy tool isn't part of the Ubuntu 12.04 setup, so you need to install it first:

sudo apt-get update
sudo apt-get install dconf-tools

There's one file explorer setting in particular that not only is not accessible via the Preferences dialog, but is also set by default to a setting that most users probably want to change.

By default, the file explorer displays the path to your current location as a series of buttons.

File explorer window with directory path buttons

While these buttons allow you to quickly jump up and down as many levels of the hierarchy as you like, they of course won't let you directly type in a directory location, nor can you paste a file path from the clipboard, or copy the path to your current directory to the clipboard.

You might therefore prefer the more traditional text box that allows you do exactly that.

To change the file explorer navigation from buttons to location entry

1) Open the DConf editor

2) Navigate to org -> gnome -> nautilus -> preferences

3) Tick the checkbox of the always-use-location-entry parameter

DConf Editor

There you have it; the directory location input control just like you remember it from the operating system that shall not be named.

File explorer window with directory path input

Monday, April 28, 2014

Installing Ubuntu

After a recent SNAFU provided the opportunity to rebuild my Ubuntu machine from scratch, I decided that this time around, I might as well keep track of what I'm installing. So, here we go, starting with, well, the actual operating system.

So, I'm installing Ubuntu 12.04 on ye olde Lenovo ThinkPad T60, with 1 GB of RAM and a 60 GB hard drive.

On a side note, I'm by no means an expert on this; if you notice any obvious (or even just subtle) errors or mistakes, please let me know.

You can find the minimum requirements to install and run the operating system here. For Ubuntu 12.04, these requirements are
64 MB RAM (512 MB recommended)
5 GB Hard Drive

Download Ubuntu
Download the current version here. Be sure to pick the right version (32 bit vs 64 bit). This download provides an iso file that allows you to create the installation CD.

Once downloaded, burn the iso file onto a recordable optical disk.

Note The iso file for Ubuntu 12.04 is 731 MB big, so you need to make sure you're using a blank CR-R that can actually take that much data (the capacity of a standard CD-R is 700 MB), and use a CD burner and software that feature the overburn option. Alternatively, you may want to burn the iso file onto a recordable DVD, just to be on the safe side.

Install Ubuntu
1) Boot the computer with your brand new Ubuntu installation disk in the CD/DVD drive (depending on your computer, you may have to manually interrupt the boot process and direct it to boot from the CD/DVD drive. The installation disk provides 3 options:

Install Ubuntu as the only system on the maching. Any data that might sit on the hard disk will be erased, the entire hard disk will become part of the Ubuntu environmental

Install Ubuntu on a separate partition. Alternatively, you can create a new partition just for Ubuntu, while leaving, for instance, your Windows environment intact. This will give you a dual-boot machine where you can run either Ubuntu or whatever other operating system you have already installed there. Obviously, for this option, your hard drive needs to be big enough to support both operating systems.

Explore Ubuntu from CD If you're not ready to commit just yet, you can start Ubuntu from the installation disk, explore the features and tools, all without making any change whatsoever to your computer.

Ideally, your computer is connected to the internet while you run the installation process, this allows Ubuntu to download any updates that may not have been included in the release provided with the iso file as part of that installation process.

Post installation updates
Even if you ran the installation process while connected to the internet and the option Download available updates selected, the first thing to pop up after starting your brand new Ubuntu system for the first time may still be the Update Manager. So you may spend some more time letting that Update Manager do its job, that way you're at least certain that your system is well and truly up to date.

First steps
If you intend to run Ubuntu with a dual screen setup (or with a single big-ass monitor), you will need to switch to Ubuntu 2D, as Ubuntu 3D supports only a very limited maximum screen size. To switch between 2D and 3D, click the little Ubuntu logo next to your user name on the login screen.

Ubuntu comes with a range of tools and applications, so you're pretty much good to go. The following list is by no means exhaustive, it just features some of the tools that may help you with your most common everyday tasks:

Mozilla's Firefox web browser. As with all applications, you may want to check for updates, as the Ubuntu distribution may not include the latest version. I'm mentioning this here specifically because the Firefox version that came with my Ubuntu download was very outdated.

Mozilla's Thunderbird email client

LibreOffice Office suite, featuring a word processor, spreadsheet application, and presentation / slideshow tool. And yes, they can handle (and create) Microsoft Office files). Additional applications are available and free, too.

Rhythmbox Music player

Movie player. It plays videos (well what did you expect)

Brasero Disk burner

GEdit text editor

Ubuntu One
For those who are keen to share their content with the NSA and other cyber-scum, Ubuntu used to provide (and still includes the tool in its current distribution) the Ubuntu One cloud service and online music store. However, this notification informs us that Ubuntu One will be shut down from June 1, 2014. So, if you're reading this before that date, it's probably best not to bother.

Saturday, March 1, 2014

How to spoof a MAC address

The Media Access Control address is a unique identifier assigned to network interfaces (For more details, see the ever reliable Wikipedia or ask Google). The MAC address is hard-coded on the Network Interface Controller (NIC). Consequently, it always remains the same, no matter where in the world you connect to the internet, and regardless of any VPN and / or proxys you might use.

You can, however, make your operating system (and subsequently the LAN you're connecting to) believe that your NIC has a MAC address of your choosing (or a randomly generated one, for that matter), rather then the one hard-coded on said NIC.

Perhaps the end user agreement of a web-based service you've subscribed to only allows you to connect a limited number of devices (or even just one), and you need to connect your new computer.

Perhaps you want to hide your identity (and that of your computer) in order to protect your privacy.

Perhaps the time-limit of the public hot spot you're using has expired (airports, public transport, coffee shops, etc), and you need to convince the public WLAN that you're connecting with an entirely new device.

Whatever your reasons may be, I won't judge you, I'm just going to show you how to do it.

Install MAC address change tool

A Google search for "MACChanger" lets you find the necessary tool for your operating system.

For Windows, you can download it here, for example.

On Ubuntu 12.04, install MAC changer using this command:

sudo apt-get install macchanger

Spoof a MAC address

Note The following process has been tested on a Ubuntu 12.04 system. For the procedure and syntax applying to your operating system, refer to the instructions on the download site you obtained MAC changer from.

First, you must stop the network manager service:
sudo service network-manager stop

Now, run MAC changer. This example generates a fully random MAC address for your wireless network interface:
sudo macchanger -r wlan0.

To spoof a MAC address for the ethernet network interface, use eth0 as the device identifier.

sudo macchanger -h lists the available options. They are:
-h Help Show summary of options
-V Version Show version of MAC changer
-e Ending Don't change the vendor bytes (e. g. your Cisco NIC will still show up as an Cisco NIC)
-a another Set random MAC address of the same kind
-A Another Set random MAC address of any kind
-p Permanent Reset to original, permanent hardware MAC address
-r Random Set fully random MAC address
-l List List known vendors
-m MAC Set MAC to specific MAC address: macchanger -m XX:XX:XX:XX:XX:XX

Finally, restart the network manager service:
sudo service network-manager start

Note that after shutting down and restarting your system, the operating system will once again broadcast the original, hard-coded MAC address of your NIC to the world.

To restore the original MAC address without rebooting, use
sudo macchanger -p wlan0.

Congrats, you're done

So there you have it. Never get bored to death again when the airport gives you a measly one hour of WiFi connectivity but your flight has just been delayed indefinitely. Now all you have to do is install MACChanger before you get kicked off the WLAN you're using, and Bob's your uncle.

Thursday, March 5, 2009

Fun with a geographically challenged Helpdesk

Yes, we all heard of the poor helpdesk worker being tormented by a not so bright user about this Anykey the computer is prompting him to press. Well, stupidity works both ways.

At work, most of the software we need is delivered to our computers electronically; if we need something that's not part of the standard build, it "just" takes a helpdesk ticket to get it. So, lucky me received a brand new state of the art machine, and all the non-standard apps I need are in the list of electronically available products.

But that's as far as my luck would go.

Only two days after lodging the Can I please have the stuff I need to do my job ticket (yeah, these guys from Global Helpdesk are really fast), the message that the requested apps are ready to install pops up. Happy and without a shred of suspicion (I know, my mistake), I click Install, and the next thing I see is:


I want my old computer back.

(For the nitpickers: In my request, I deliberately left out the release version, naively believing that they would send me whatever is available for our site).

And tomorrow, I get to chase up the other application I need, the one for which they closed the ticket without bothering to send me anything.

I predict that some time early May, I get to work productively again.